Scripting
As of version 0.18 nymea supports scripting using JavaScript and QML. Scripting can be used to automate behaviors, similar to rules, but are aimed towards a more advanced usage of nymea. While scripting requires a basic understanding of the JavaScript programming language, it also features a much more powerful way to interact with nymea.
It is recommended to install nymea:app on a PC in order to use the script editor.
The recommended way to create and edit scripts is the integrated script editor in nymea:app. It can be found in the mains screen’s menu -> Magic using the script icon in the upper right corner.
Introduction
nymea scripts follows the QML syntax. Please refer to the QML Documentation for details on the QML language. A script can be thought of like a small app running inside nymea core. As soon as a script has been deployed to nymea:core it will be loaded and execution starts. The script might then listen to state changes in the system, or use timer events to trigger execute actions in the system.
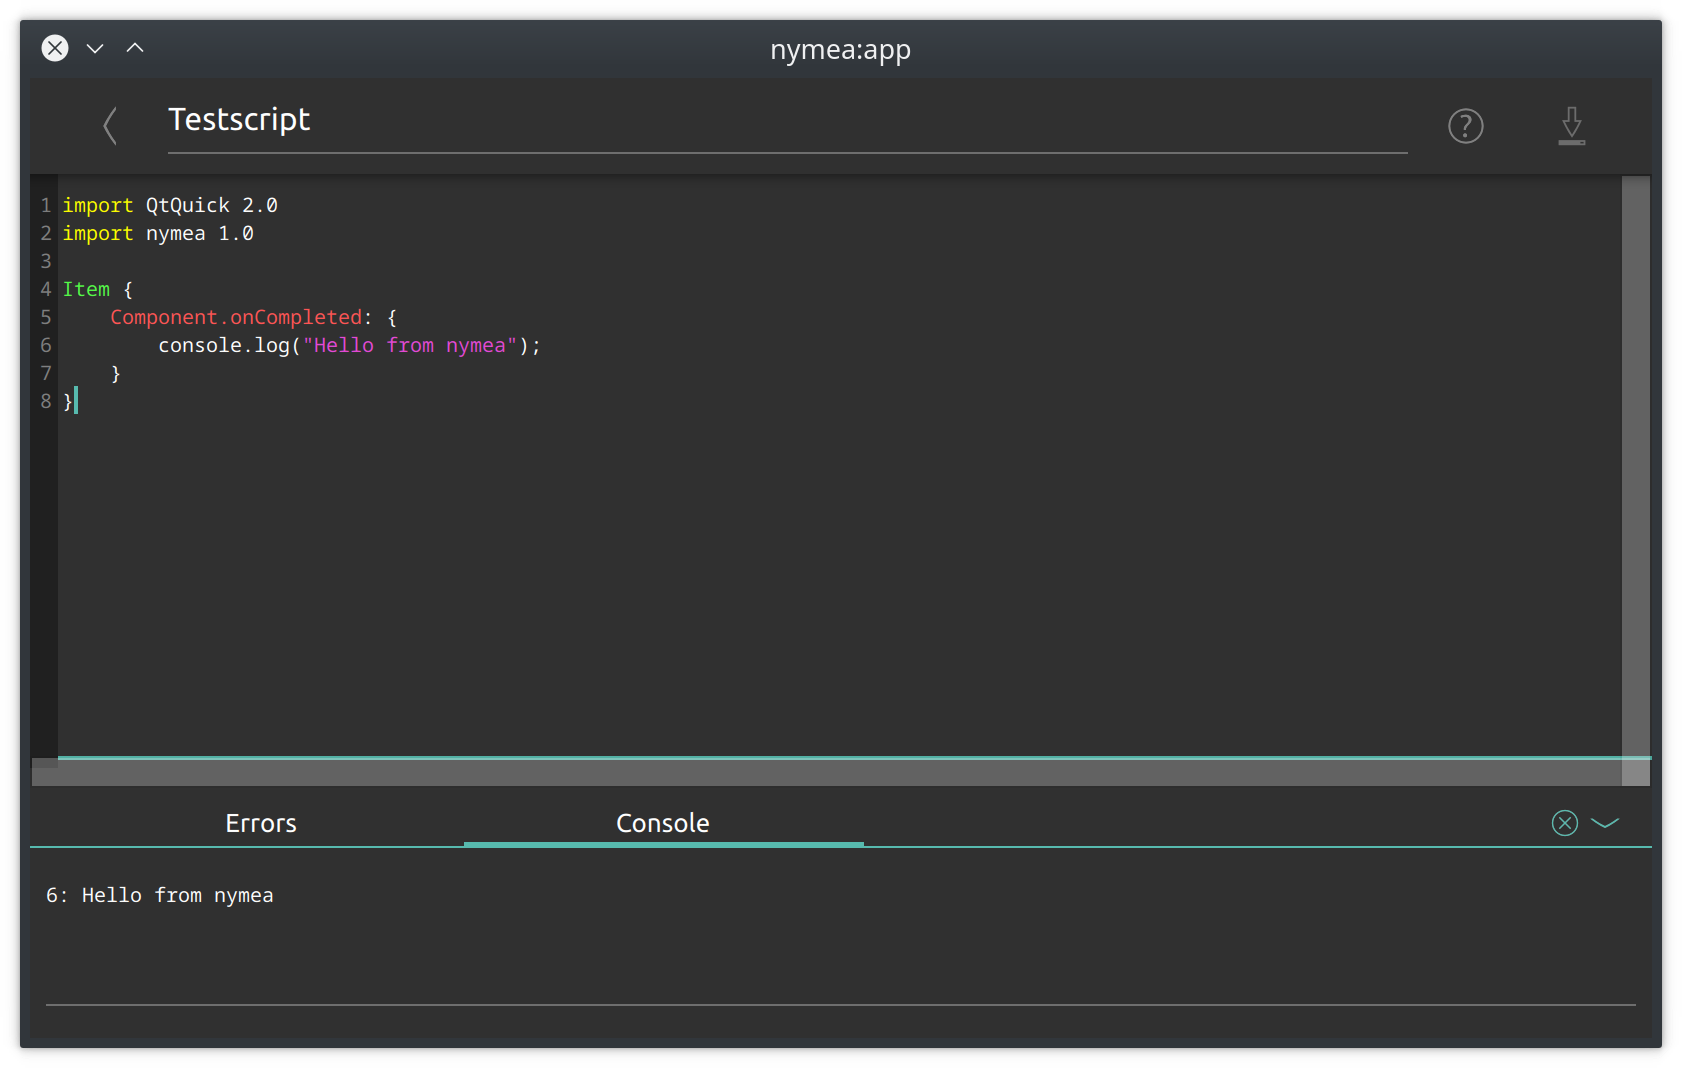
The nymea:app script editor will report console output for the script as well as errors in the script:
Basic structure
The most basic structure of a nymea script looks like this
import QtQuick 2.0
import nymea 1.0

Item {

}
This example script will be functional, but it doesn’t actually do anything. Depending on the
purpose of the script, different content may be added inside the Item {} structure. Every script
must have exactly one main item, the so called root item. This root item might contain any number of
child items.
For example, in order to act on a motion sensor detecting presence, such a block can be added:
import QtQuick 2.0
import nymea 1.0

Item {
    ThingState {
        thingId: "123456-1234-1234-123456"
        stateName: "isPresent"
        onValueChanged: {
            console.log("Presence detected:", value);
        }
    }
}
This script will log the text “Presence detected: true” into the script’s console when the motion sensor detects a person and “Presence detected: false” when the person leaves again.
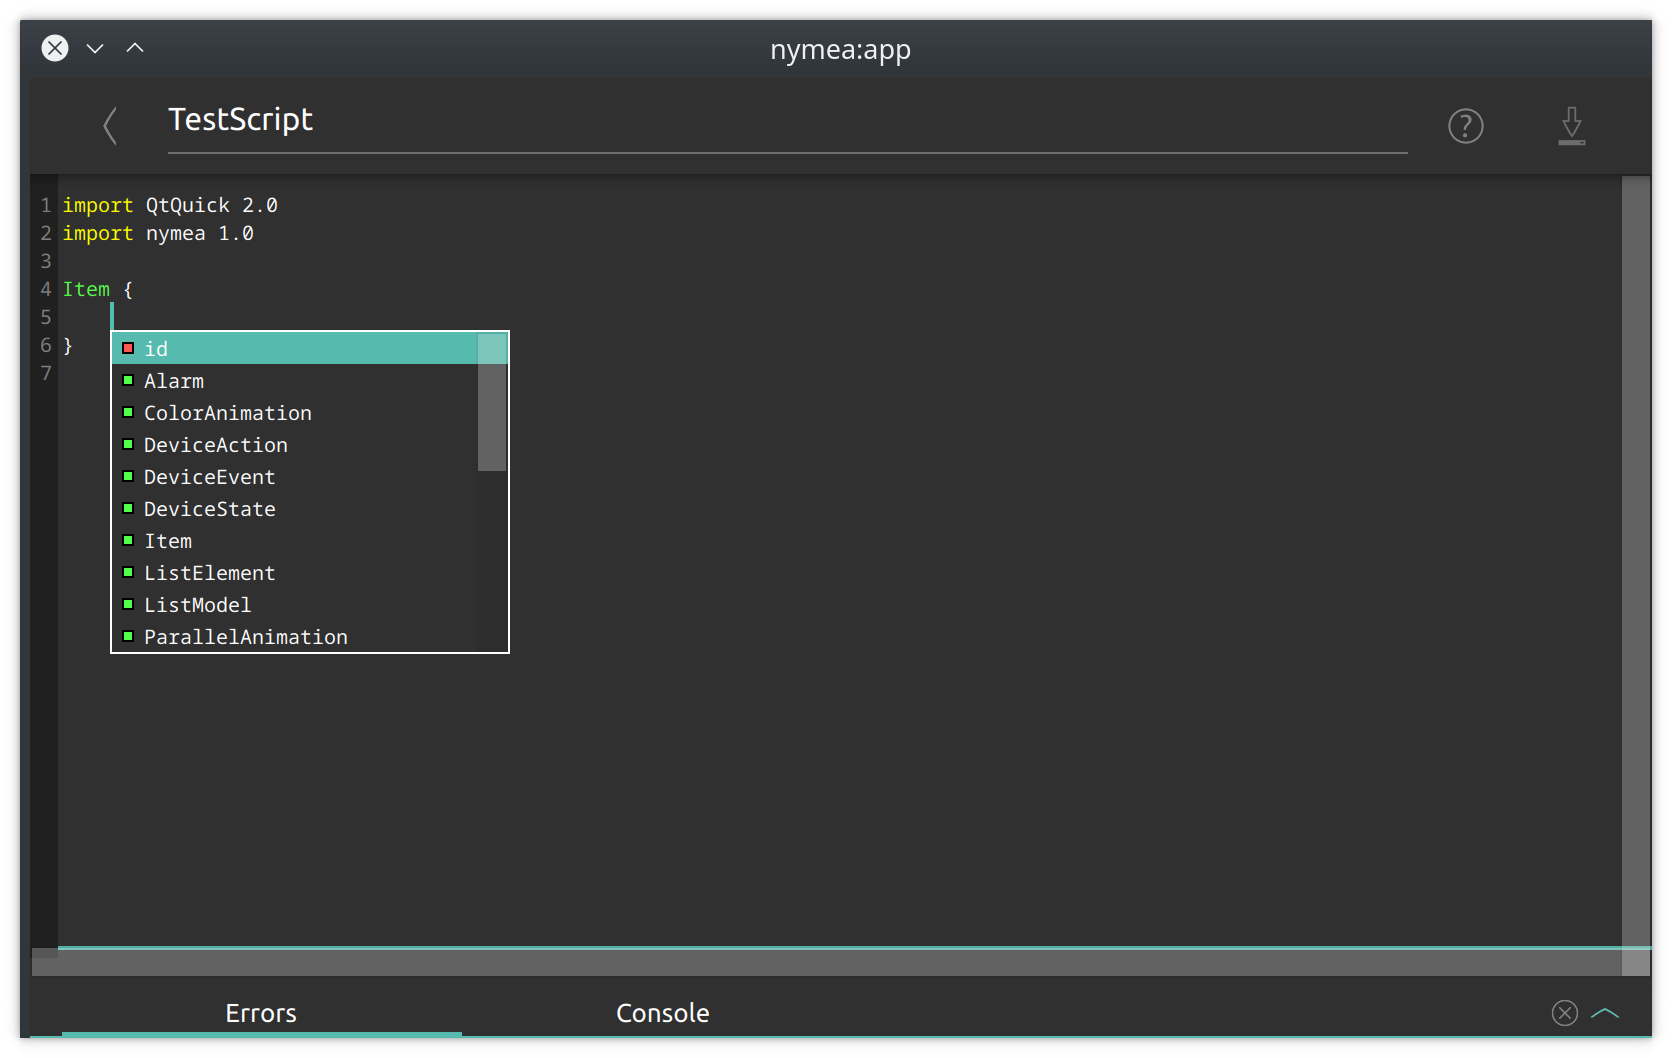
Code completion
At any point while creating a script, nymea:apps script editor can support the creation by performing code completion. The code completion will pop up automatically in many places but can be invoked at any point by hitting Ctrl+Space (or Cmd+Space on macOS).
IDs and names
The most basic concept in nymea scripting is how to define and refer to certain things. For one, there is the need to reference to other parts of the script, like accessing properties and calling functions of objects. For the other, there is the need to reference to things (as in devices and services) in the nymea setup to react on them or execute actions on them.
id
The id property is part of the QML language. Every element in QML can have an id property. The value for this can be defined freely by the script developer as long as it starts with a lowercase letter and does not contain special characters. Those ids basically give the element a name so that it can be referred to from other places in the script. It is not mandatory to add such id properties if it’s not required to “wire” up elements.
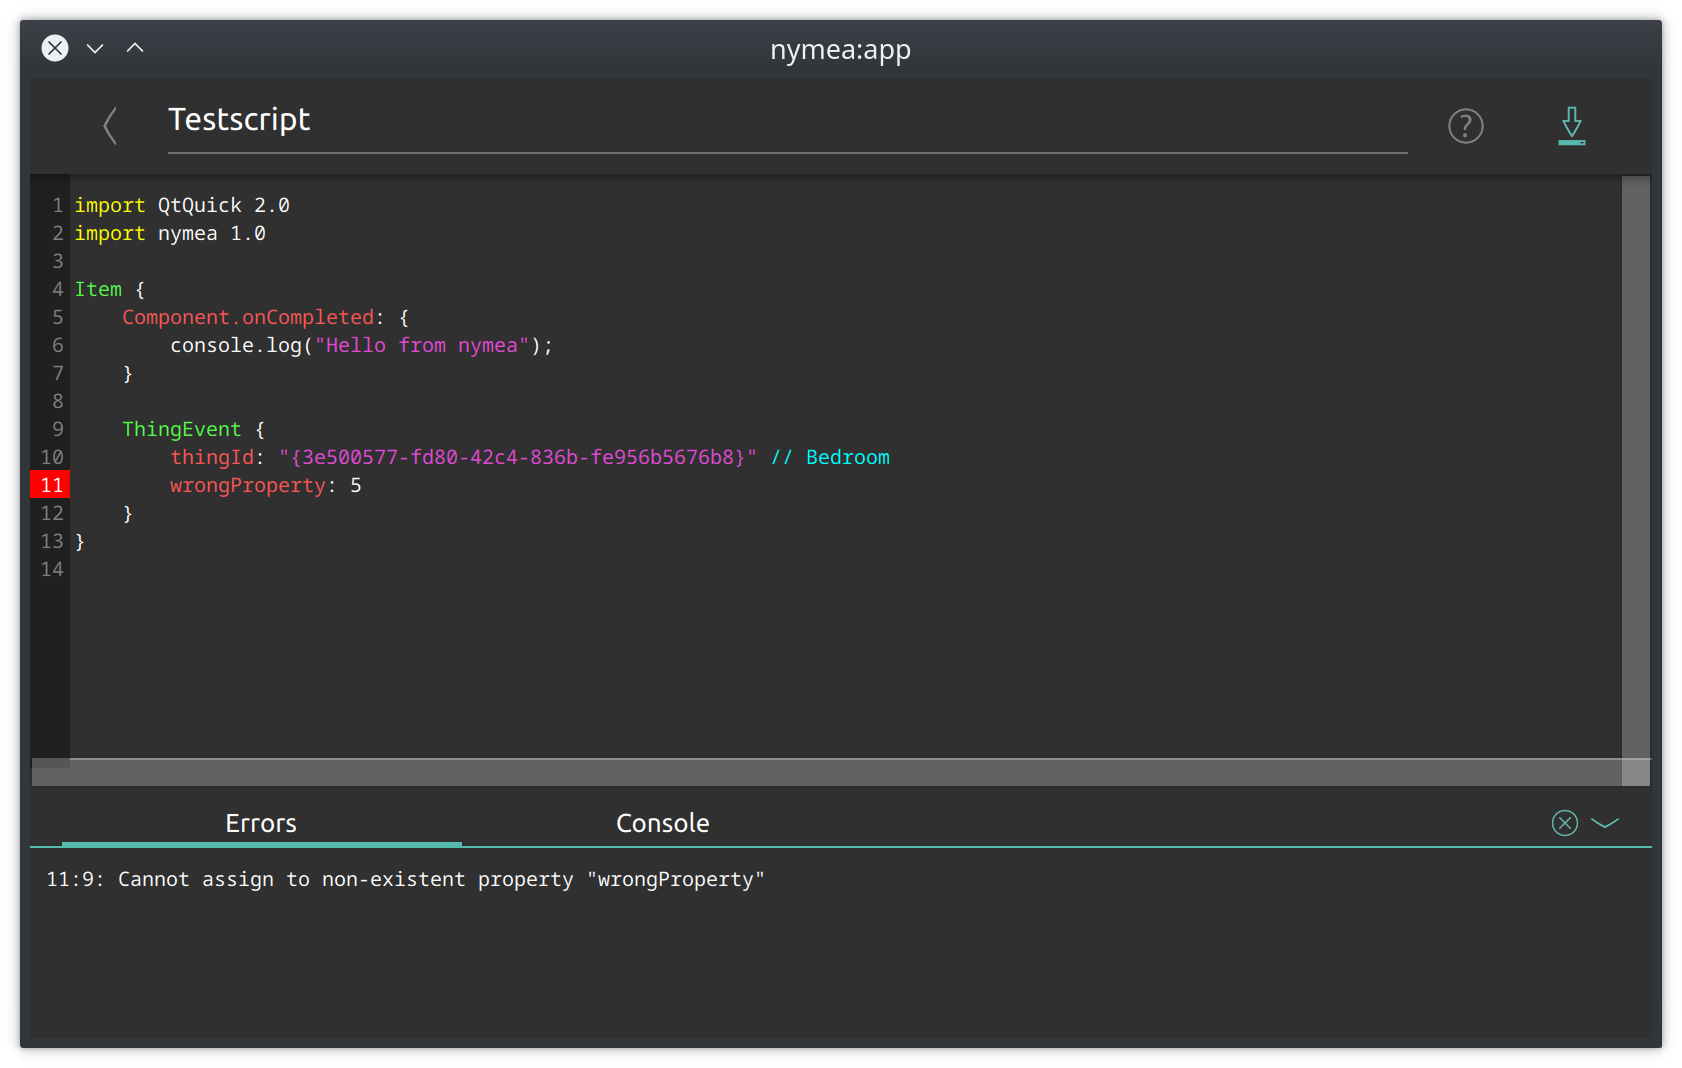
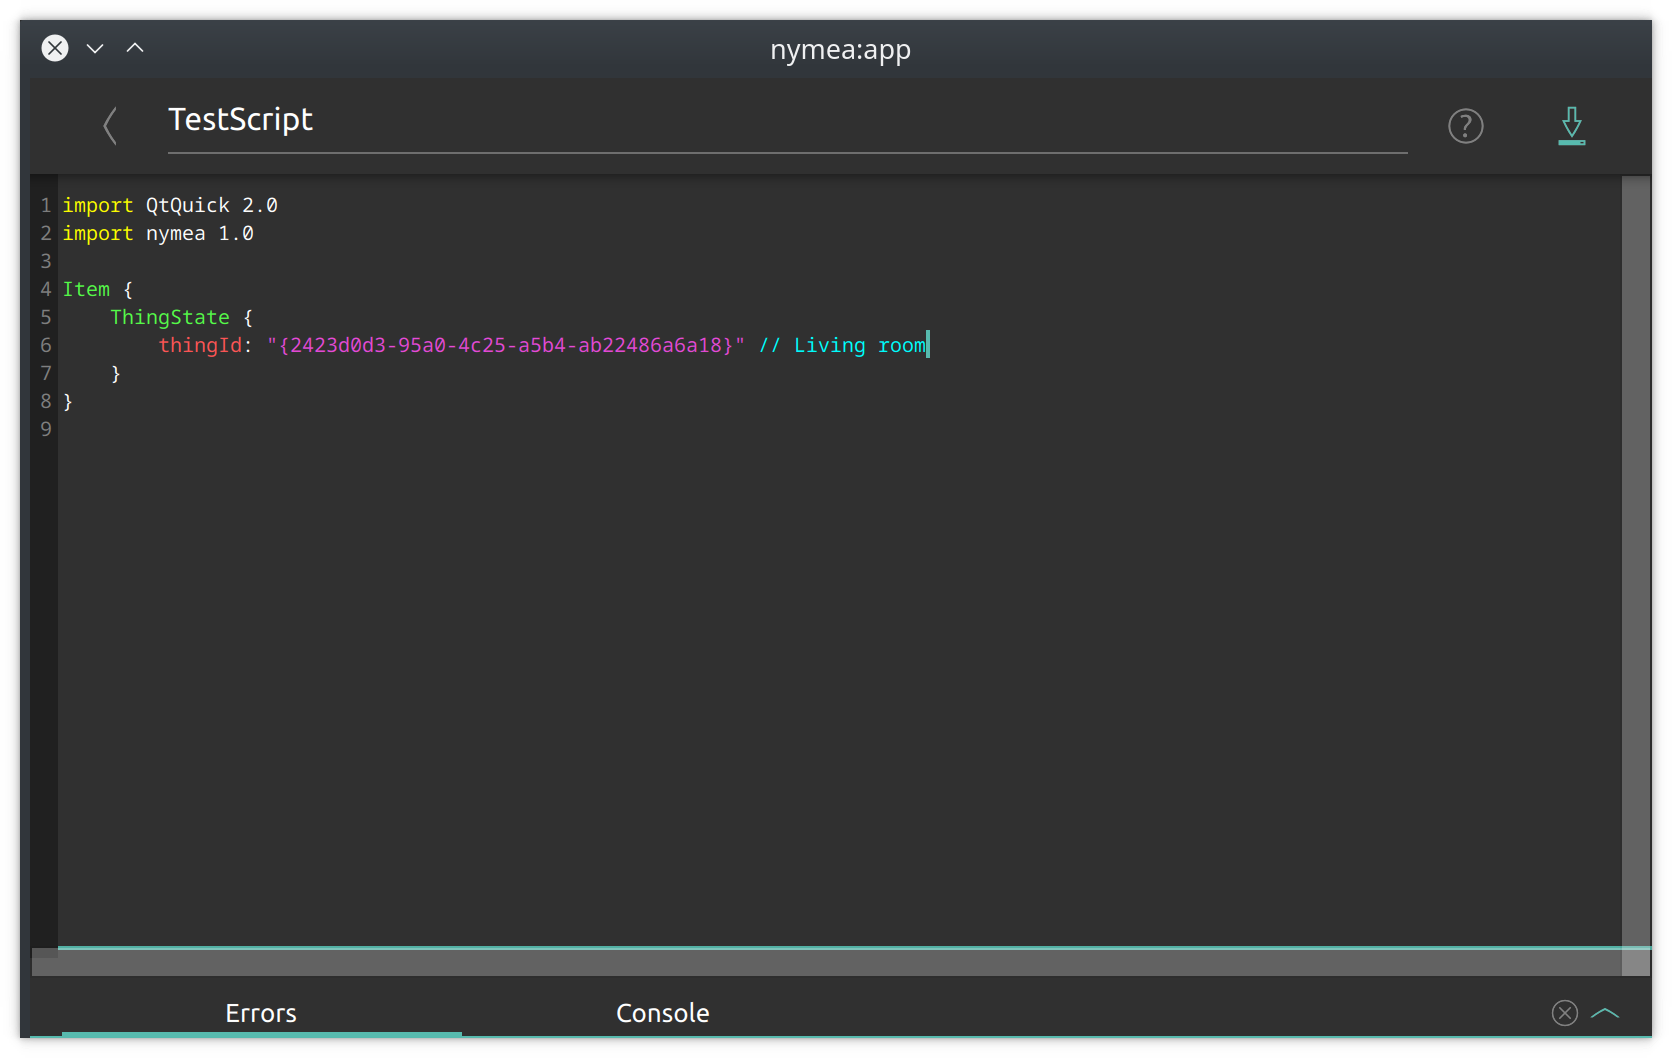
thingId
Throughout the nymea scripting, there will be the need to provide values for thingId properties. Those must be set to a UUID which refers to a particular thing in the system.
The reason for using ids instead of thing names is because the id is persistent. The user might rename a thing and existing scripts will still continue work. If we’d use the things name here, the scripts would be more fragile and break easily.
As those IDs are an implementation detail, they are not easily visible in the app, however, the nymea:app script editor provides code completion which allows to select things by name and it will automatically insert the proper ID for it.
When placing the cursor after the text thingId: " the script editor will pop up suggestions for all the things in the system.
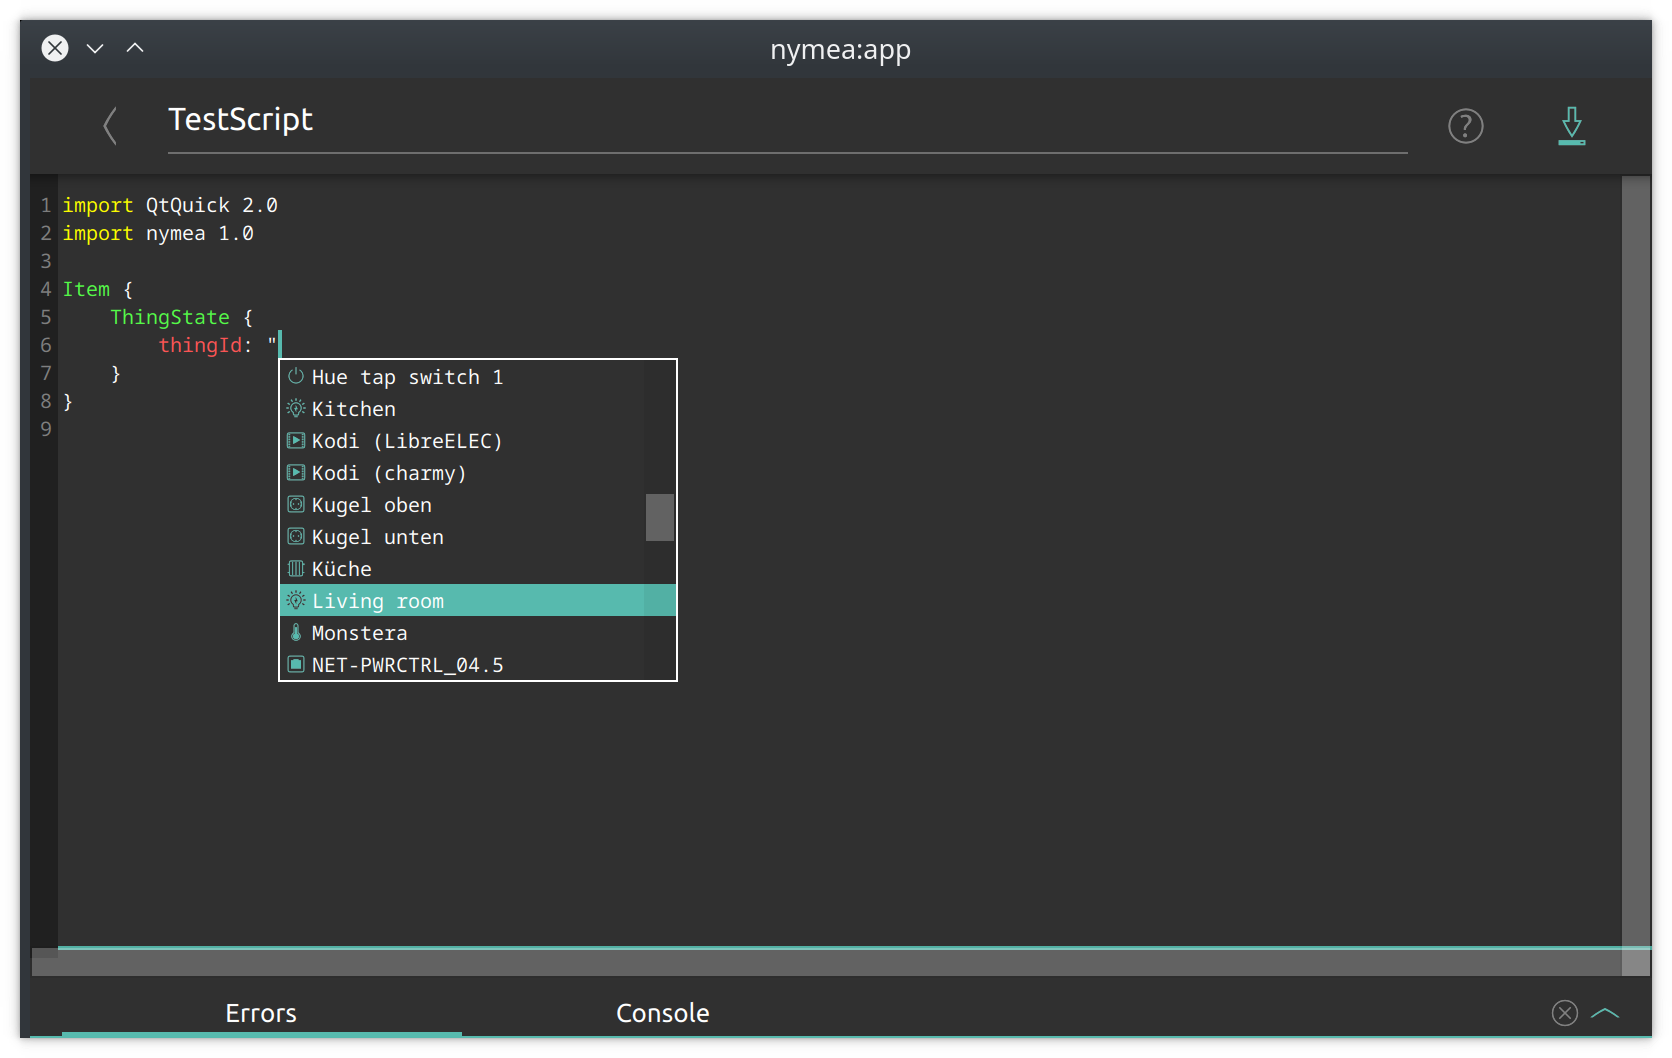
Selecting an entry will cause the script editor to fill in the appropriate ID for this ting.
As IDs are unique to a certain nymea setup, in this documentation we’ll use
as a placeholder for the actual id.
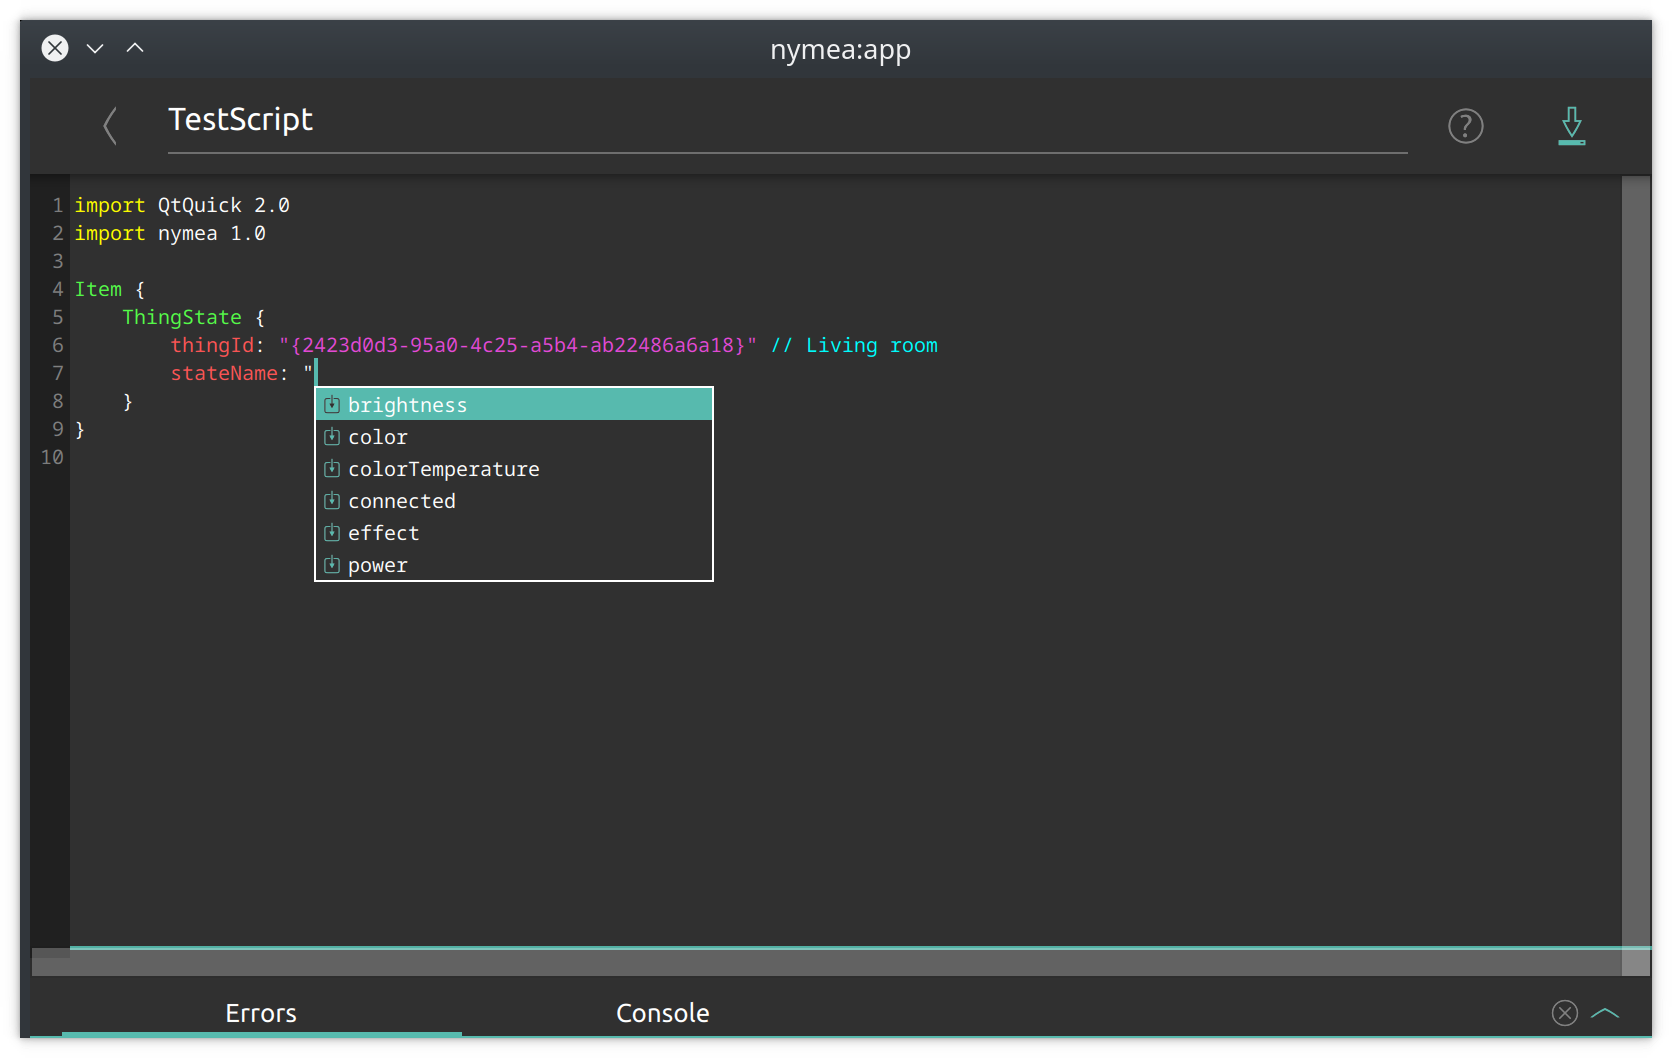
stateName, eventName, actionName
Similar to thingId, the properties stateName, eventName and actionName need to be filled in by choosing the possible values from the actual things installed in the nymea system. Depending on the chosen thingId the possible values for those differ. Please use the nymea:app code completion to get a list to chose from.
Available types
The script engine supports all the types as found in the QML Documentation. Thos most useful ones for nymea scripts will likely be
- Timer
- Repeater
- ListModel
- ListElement
In addition to those, a set of nymea specific types are supported. The most important ones being:
ThingState
A ThingState is used to read or modify a certain device’s state in the system.
A ThingSate is required to have the thingId property set in order to identify a thing. In addition to that, setting the stateName property is required to identify a particular state. For example, a light bulb would have a stateName called "power".
Each ThingState has a value property which contains the actual current value of the state. For instance, a light bulb will contain true in the value property when it’s turned on and false when it’s off. Also it can be turned on or off by setting the value property accordingly.
In order to react on state changes, the onValueChanged signal handler can be implemented.
Example:
ThingState {
    thingId: "<thingId>"    // ID for the lightbulb
    stateName: "power"      // The name for the state we're interested in
    value: true             // This would initialize the value to `true`, turning the light on when nymea starts

    onValueChanged: {
        if (value == true) {
            console.log("the light has been switched on");
        } else {
            console.log("the light has been switched off");
        }
    }
}
ThingEvent
A ThingEvent is used to react on events in the system.
It requires to have the thingId property set in order to identify the thing we’re watching for events. In addition to that, setting the eventName property is required to select the actual event. For instance, a wall switch would have a pressed event.
A ThingEvent has a signal named triggered which is fired whenever the event happens. Using the onTriggered handler it is possible to act on those events.
The following example script would write a log warning whenever the switch is pressed.
ThingEvent {
    thingId: "<thingId>"     // The id of the wall switch
    eventName: "pressed"     // The name of the event we're watching

    onTriggered: {
        console.log("Wall switch has been pressed!")
    }
}
ThingAction
A ThingAction is used to execute an action on a particular thing.
A ThingAction is required to have the thingId property set in order to identify a particular thing and the actionName property to match the desired acton.
A ThingAction has a function named execute(params) which can be called to actually execute the action. The params are a map for the parameters this action requires.
A ThingAction has an event named executed(status, params, triggeredBy) which will be triggered whenever the action is executed. Optionally, this can be used to track any executions on this action. The event has parameters informing about the execution status, the parameters and whether the action was triggered by the user e.g. using nymea:app or by a rule or script.
For instance, a thing capable to send push notifications could to be used this way:
ThingAction {
    id:notificationAction   // Giving it an id so we can call its execute() function
    thingId: "<thingId>"     // The id of the notification thing
    actionName: "notify"     // Selecting the "notify" action
    onExecuted: {
        console.log("Action was executed with status", status, "and params", params, "by", triggeredBy)
        if (status != Thing.ThingErrorNoError) {
            console.warn("Error", status, "happened during action execution")
        }
        if (triggeredBy == Action.TriggeredByUser) {
            print("The action was exectued by the user.")
        }
    }
}
...
notificationAction.execute({"title": "Hello", "body": "nymea rocks!"})
InterfaceEvent
A InterfaceEvent is very similar to the ThingEvent with the difference that it does not only receive events from a particular thing, but instead it can receive events from a whole group of things.
The onTriggered handler will receive the thingId as well as the params for the event.
This might be useful for cases where a certain event is of interest, regardless of which thing it comes from. One example would be to notify the user when something runs out of battery.
InterfaceEvent {
    interfaceName: "battery"
    eventName: "batteryCritical"
    onTriggered: {
        console.log("Thing", thingId, "runs out of battery:", JSON.stringify(params));
    }
}
InterfaceAction
A InterfaceAction is similar to the ThingAction with the difference that it executes actions not only on a single thing, but instead executes the same action on a while group of things.
For example, turning off all lights at once:
InterfaceAction {
    id:allLightsPowerAction
    interfaceName: "light"
    actionName: "power"
}
...
allLightsPowerAction.execute({"power": false});
Thing
A Thing allows to interact with a particular thing, that is, reading and setting state values, execute actions and listening to events. If many events/states/actions are needed from a single thing, this may be more convenient than multiple ThingEvent/ThingState/ThingAction items. However, this variant doesn’t allow to use property bindings as convenient as the other types. Additionally this allows to retrieve informationa about a thing, such as its name.
Example usage:
Thing {
    id:exampleThing
    thingId: <thingId>
    onEventTriggered: console.log("Event triggered for thing:", exampleThing.name, eventName, JSON.stringify(params));
    onStateValueChanged: console.log("State changed for thing:", exampleThing.name, stateName, value);
    onActionExecuted: console.log("Action", actionName, "executed on", exampleThing.name, "with status", status, "and params", JSON.stringify(params), "by", triggeredBy)
}
...
exampleThing.setStateValue("power", true);
exampleThing.executeAction("notify", {"title": "Hello", "body": "World"});
Things
The Things item holds a model of all things in the system. Specifying the filterInterface property allows filtering things by interface.
Things {
    filterInterface: "light"

    onThingAdded: console.log("A lighting thing has been added to the system:", thingId)
    onThingRemoved: console.log("A lighting thing has been removed from the system:", thingId)
}
Use get(index) to retrieve a thing by its index in the model, or getThing(<thingId>) to retrieve things by their id.
Things {
  id:myThings
}
InterfaceState {
    interfaceName: "battery"
    onStateChanged: console.log("Battery level changed to", value, "for", myThings.getThing(<thingId>).name)
}
Things can be used to populate a repeater:
Alarm {
    id:alarm
}
Repeater {
    model: Things {
        filterInterface: "light"
    }
    delegate: Item {
        ThingState {
            thingId: model.thingId
            stateName: "power"
            value: alarm.active
        }
    }
}
Alarm
An Alarm is used to execute actions or set states at given times.
The Alarm requires at least the property time to be set. In addition to that, endTime and weekDays may be set if desired.
The time property defines the time when this alarm should trigger. It is set in 24h format. The endTime property can be used to define a duration for the alarm. During the time between time and endTime, the active property will be set to true. The weekDays property can be used to restrict the alarm to certain weekdays. If this property is not set, it will default to Alarm.AllDays causing the alarm to trigger every day at the specified time.
Whenever the Alarm triggers it will emit the triggered signal. The onTriggered handler can be used to act on it.
For instance, an alarm that triggers Monday to Friday at 7:00 in the morning can be set up with this example:
Alarm {
    time: "07:00"
    endTime: "08:00"
    weekDays: Alarm.Monday | Alarm.Tuesday | Alarm.Wednesday | Alarm.Thursday | Alarm.Friday

    onTriggered: {
        console.log("Alarm triggered!")
    }

    onActiveChanged: {
        if (active) {
            console.log("Alarm active now!")
        } else {
            console.log("Alarm ended")
        }
    }
}
Adding more JavaScript
Anywhere in the script, standard JavaScript can be added. For instance we can count the number of button presses. To execute an action when a button is pressed 5 times within 5 seconds, we can use such an example:
Item {
    id:root

    propertyint counter: 0

    Timer {
        id:timer
        interval: 5000
        repeat: false
        running: root.counter > 0 // The timer only runs when the counter is > 0.
        onTriggered: {
            root.counter = 0; // Reset the counter after 5 secs. This will also stop the timer.
        }
    }

    ThingEvent {
        thingId: "<thingId>" // id of button
        eventName: "pressed"
        onTriggered: {
            root.counter = root.counter + 1; // Increase the counter, this will start the timer if not running.
            if (root.counter >= 5) {
                console.log("Button pressed 5 times within 5 seconds!")
                root.counter = 0; // Reset the counter. This also stops the timer.
            }
        }
    }
}
Putting things together
Binding states
ThingStates can be linked using a property binding. For instance, to turn on a light while a presence
sensor reports presence, set the light’s power state value to the sensor’s presence state:
ThingState {
    id:presenseState
    thingId: "<thingId>" // id of presence sensor
    stateName: "isPresent"
}
ThingState {
    thingId: "<thingId>" // id of light
    stateName: "power
    value: presenseState.value
}
In this example, the light’s power state value is set to the presence sensor’s isPresent state’s value.
This way, whenever the value for isPresent changes, it will automatically be synced to the power state.
Reacting on events
Things that have events, e.g. a power wall switch that has a “pressed” event, can be used to execute an action in the system. Let’s turn on a light when a button is pressed, but only if it’s dark outside:
ThingEvent {
    thingId: "<thingId>" // id of button
    eventName: "pressed"
    onTriggered: {
        if (daylightState.value == false) {
            lightPowerState.value = true;
        }
    }
}
ThingState {
    id:daylightState
    thingId: "<thingId>" // id of daylight sensor
    stateName: "daylight"
}
ThingState {
    id:lightPowerState
    thingId: "<thingId>" // id of light
    stateName: "power"
}